
Working in Blueprint
UE5 Quest System Version: 2.0Who this page is for ...
If you're integrating this quest system with a dialogue system or crafting a unique player quest experience, you'll likely want manual control over certain aspects of quest progression. This could include showing a quest window, accepting or completing a quest, or even advancing objectives. In cases like this where manual control is needed, you'll handle this from the blueprint side.
To streamline this process, I've prepared various helper functions and events. This page will walk you through accessing and using these helpers effectively.
Working in Blueprint Video Guide
This video guide will walk you through working in blueprint step by step. If you prefer text over video keep reading below for a breakdown of everything.
The Main Components
For each player in your game, two components are used:
AC_QuestSystem_PlayerController: This component is the one we attached to our player controller to install the quest system. This component serves as a crucial link between the player and the game world. It handles various tasks such as spawning and managing the player's quest indicators, player interactions with quest actors, and spawning our UI. If an aspect is unique to the player and not directly tied to quest related data, it's likely managed within this player controller component.
AC_QuestSystem_PlayerState: This component manages anything related to quest data for that specific player, this includes saving and loading of the data. It is also responsible for scanning and managing the state of quests that become available based on your prerequisites. This scan is data driven and is not the scan that is used for finding actors in your world (this scan is in the World Quest Helper). This component is attached to your player state automatically by the player controller component.
A reference to the player state component is available within the AC_QuestSystem_PlayerControllercomponent, the variable is called questStateHelper. Additionally, you can retrieve these yourself using the getComponentByClass function, specifying either your player controller or player state as the target:
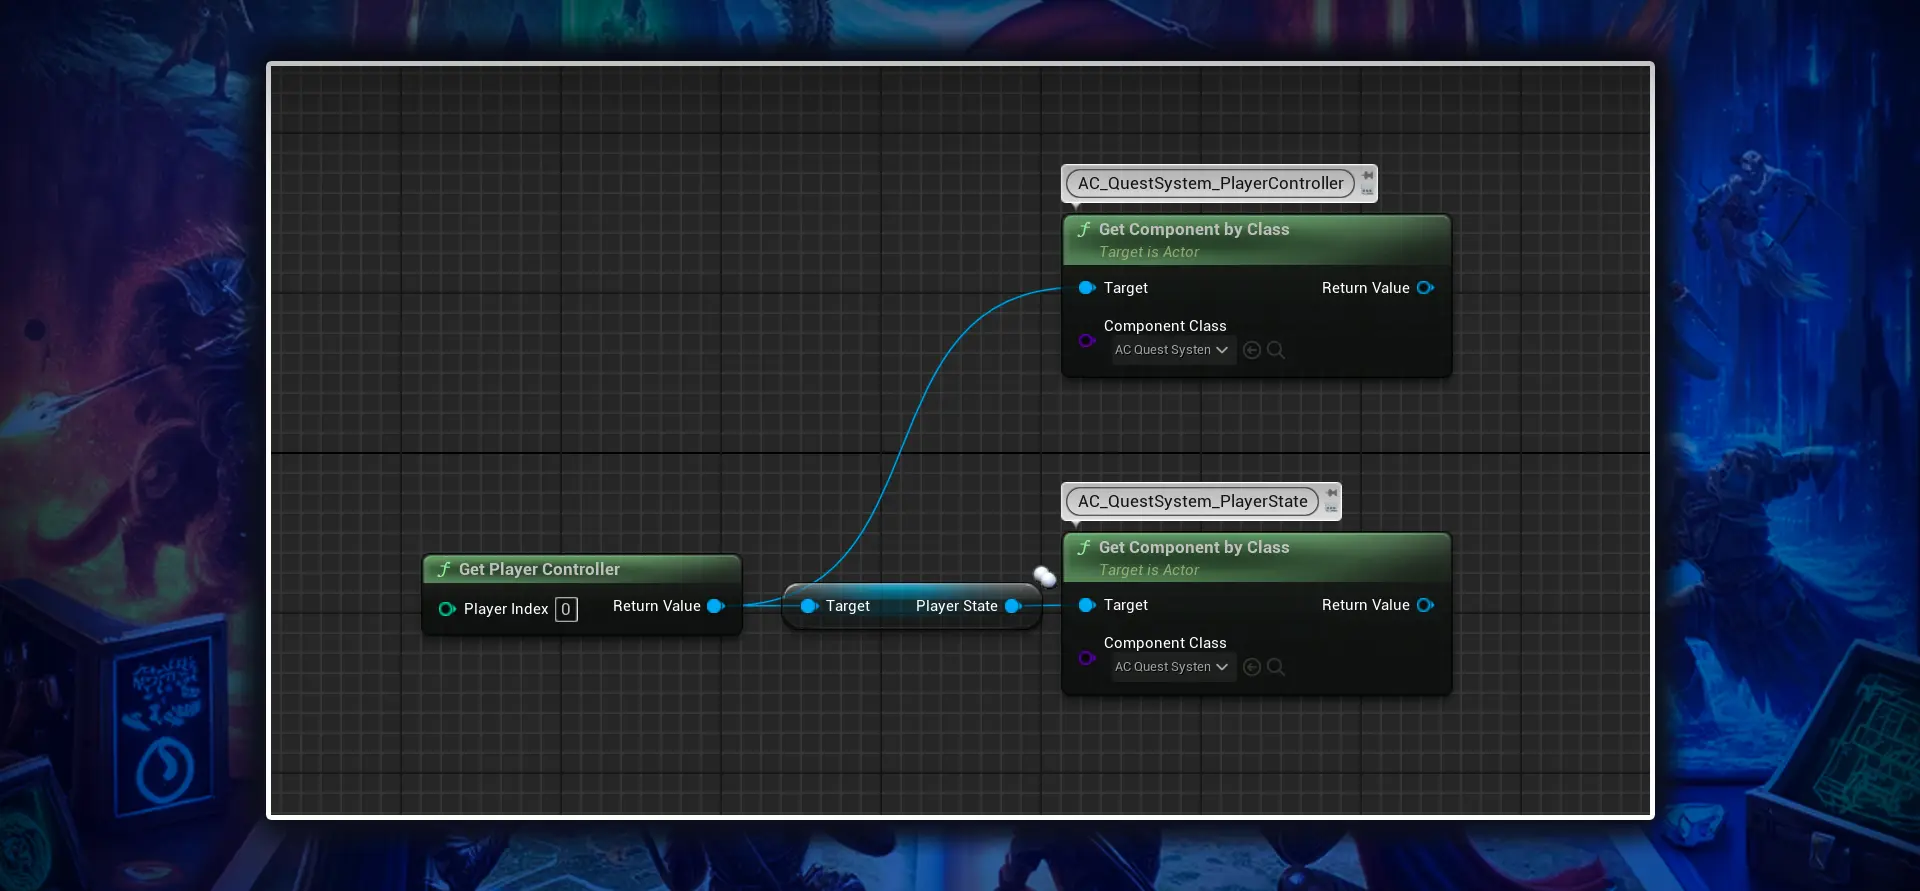
In multiplayer games take precaution when using getPlayerController and calling it from the server as doing so it will use the listen server's controller instead. To reference the client's player controller on the server you will usually need to pass the reference to the server using inputs on your function or event. If you are new to multiplayer or struggling with this concept I recommend reading through the Multiplayer Network Compendium.
For further details on the functions available in each of these components, refer to the System Overview section of the documentation.
Accepting Quests from Blueprint
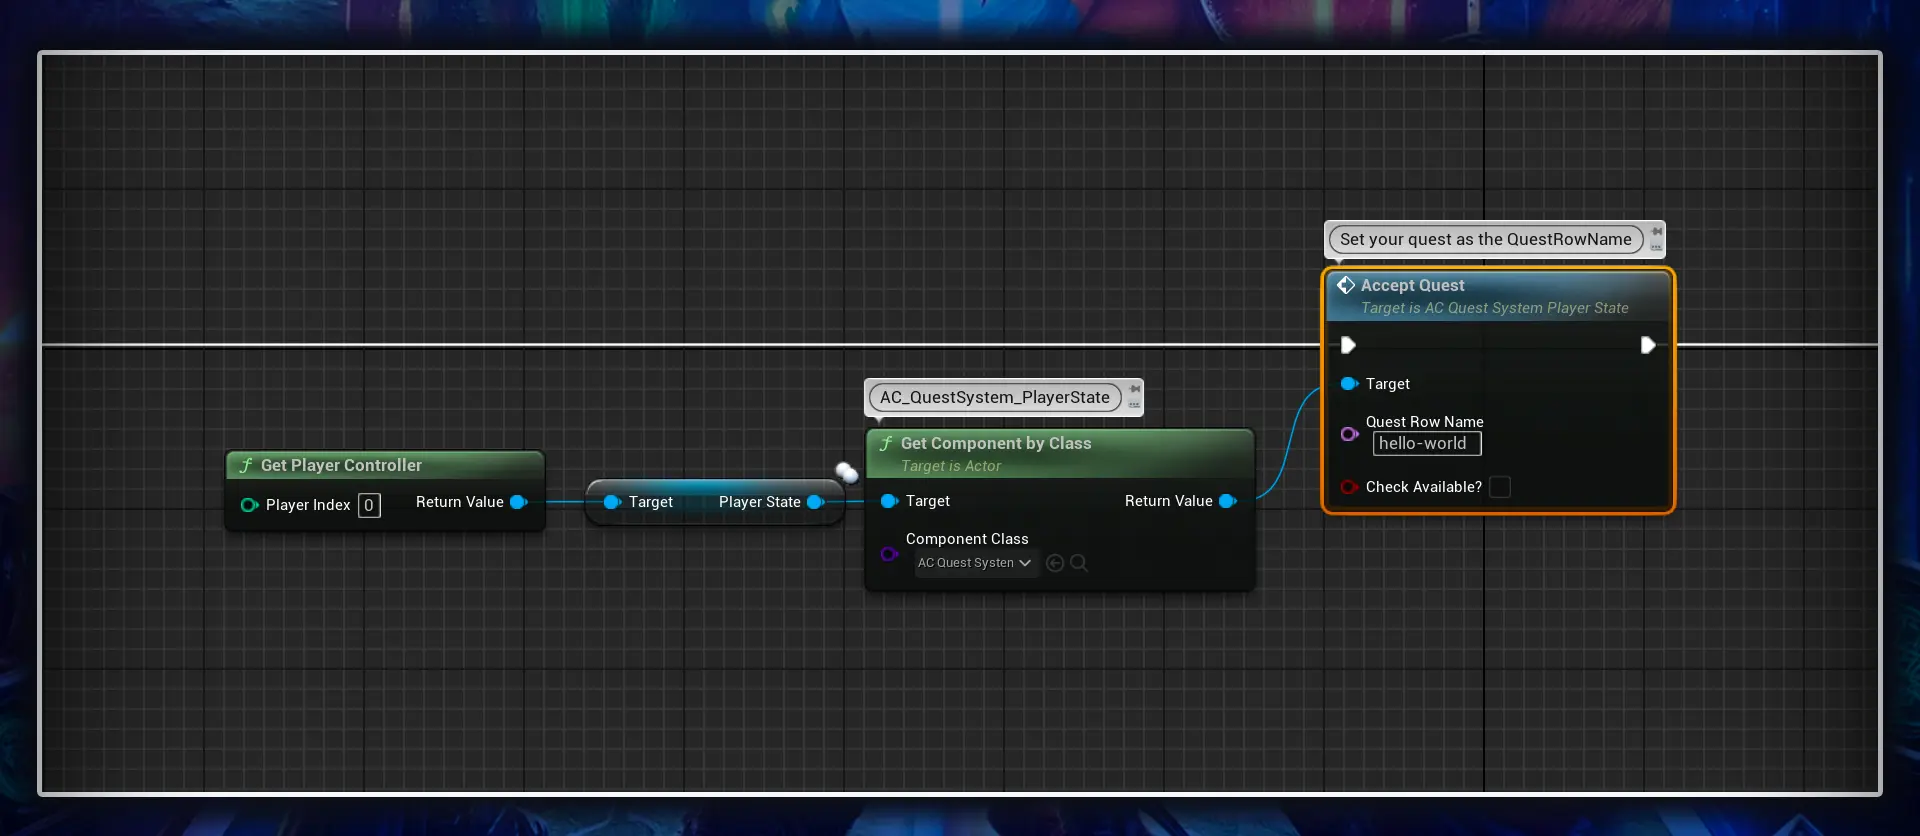
To accept a quest in blueprint, follow these steps:
- Obtain a reference to the AC_QuestSystem_PlayerState component on the Player State for the player you wish to accept the quest on.
- Call the acceptQuest event on the component's reference.
- Set QuestRowName on this event to the Row Name as it matches for your quest in your DT_Quests data table.
- Optionally, you can enable the CheckAvailable? boolean parameter on this event to have the quest system verify that the quest is currently in the available quest state.
Completing Quests from Blueprint
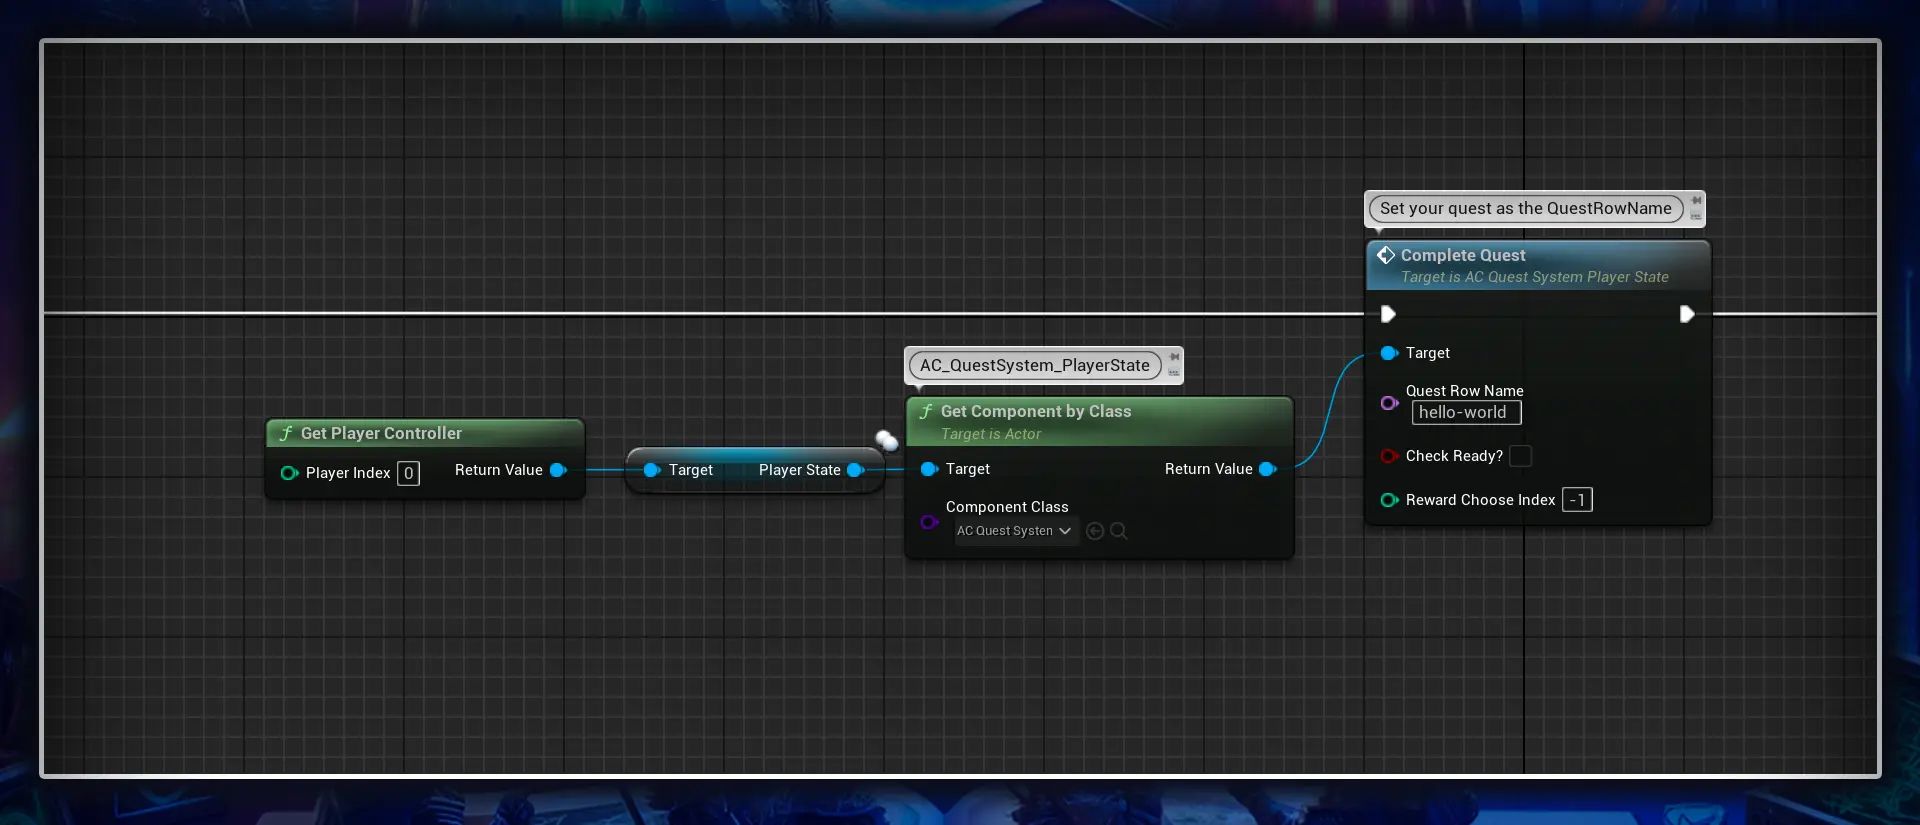
To complete a quest in blueprint, follow these steps:
- Obtain a reference to the AC_QuestSystem_PlayerState component on the Player State for the player you wish to complete the quest on.
- Call the completeQuest event on the component's reference.
- Set QuestRowName on this event to the Row Name as it matches in your quest data table for this quest.
- Optionally, you can enable the CheckReady? boolean parameter on this event to have the quest system verify that the quest is currently in the ready to turn in quest state.
- You can also supply the RewardChooseIndex with this event which will let you specify the item choice Quest Reward (if used).
Now if what you really wanted to do was just make the quest ready to turn in and let the player complete the quest themself you should call the ReadyToTurnInQuest event instead, details on this one can be found below.
Additional Events related to changing the Quest State
Alongside the acceptQuest and completeQuest events, there are additional events on the AC_QuestSystem_PlayerState component that function similarly. These events include:
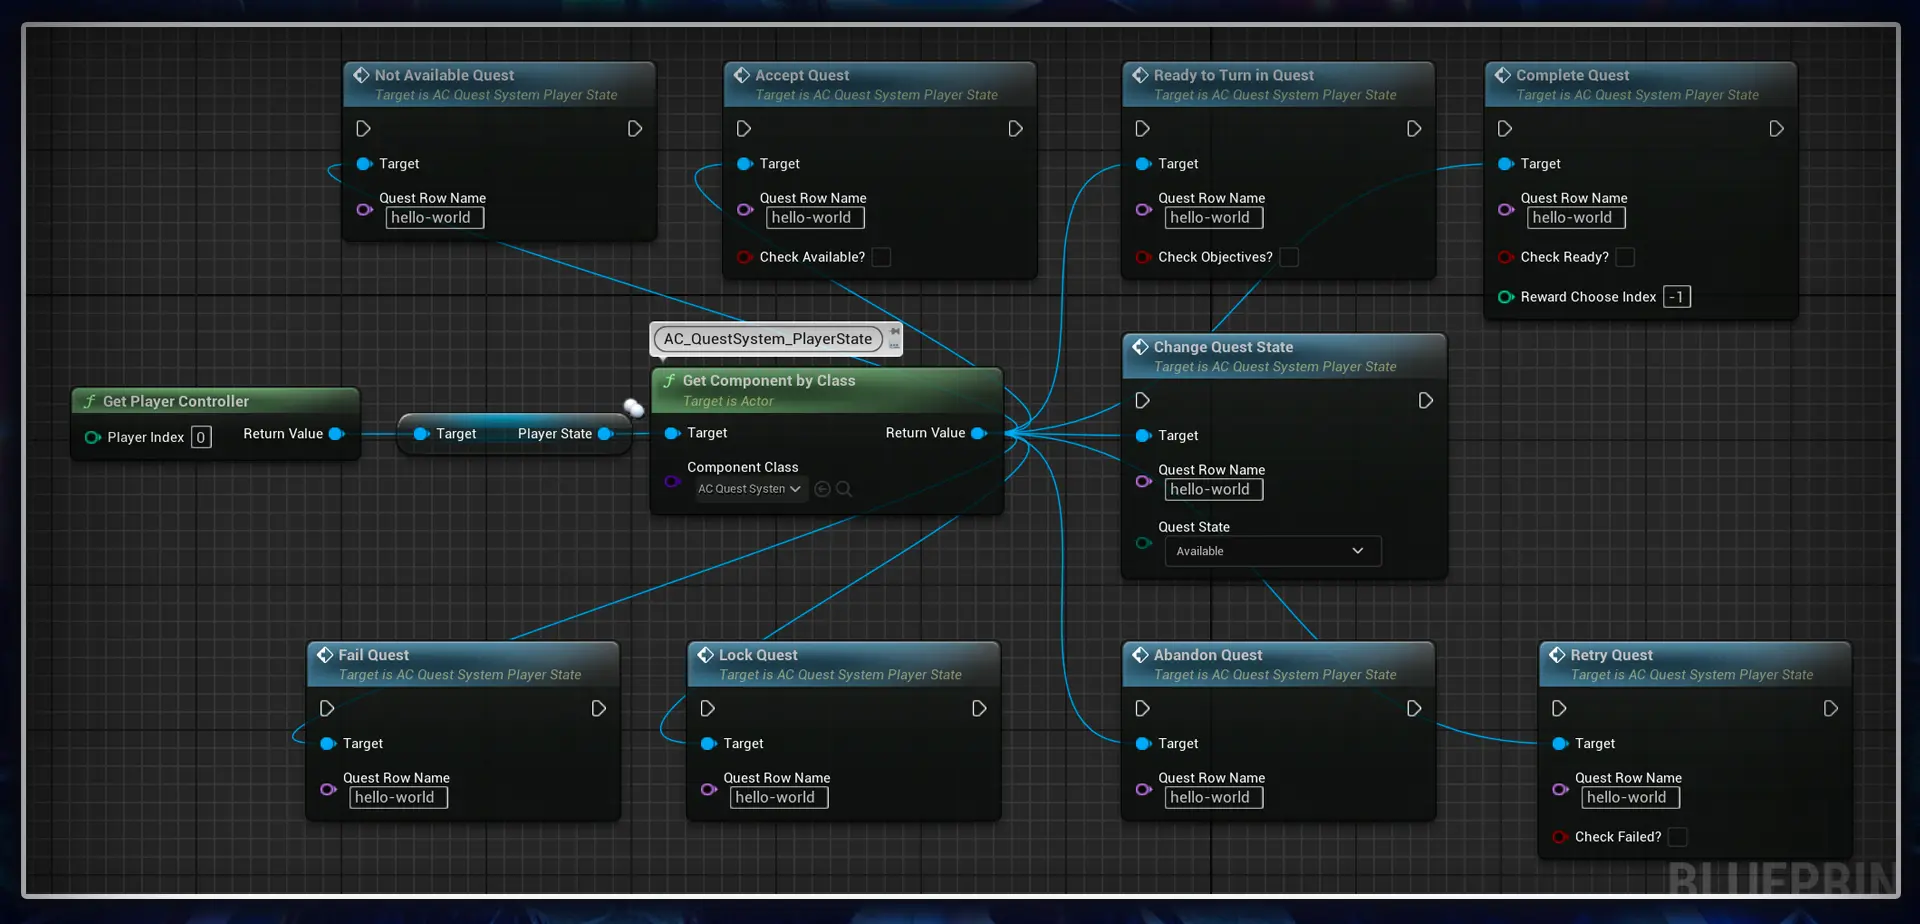
Completing Objectives from Blueprint
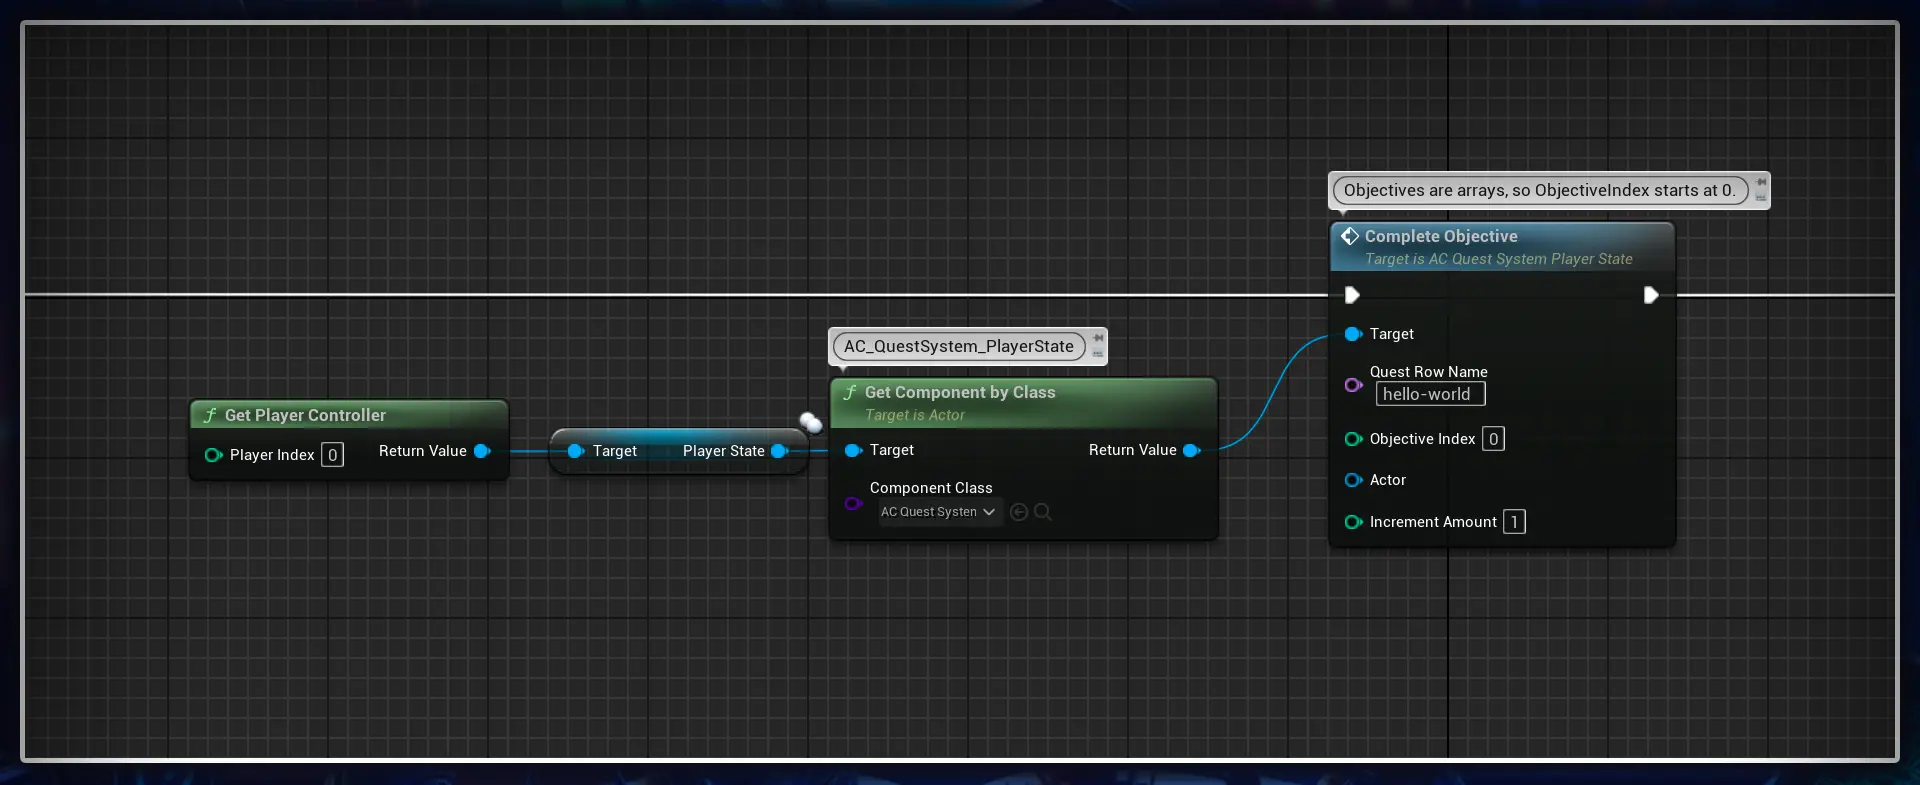
To complete a quest objective in blueprint, follow these steps:
- Obtain a reference to the AC_QuestSystem_PlayerState component on the Player State for the player you wish to complete the objective on.
- Call the completeObjective event on the component's reference.
- Set QuestRowName on this event to the Row Name as it matches in your quest data table for this quest.
- Set the ObjectiveIndex to the index of the objective, as it appears in your data table starting from 0.
- Optionally, you can provide an Actor to add to the player's ignore list (if the option is enabled), as well as an Increment Amount if your quest uses a count variable and you would like to provide a count value greater then the default of 1.
Getting the Current Quest State
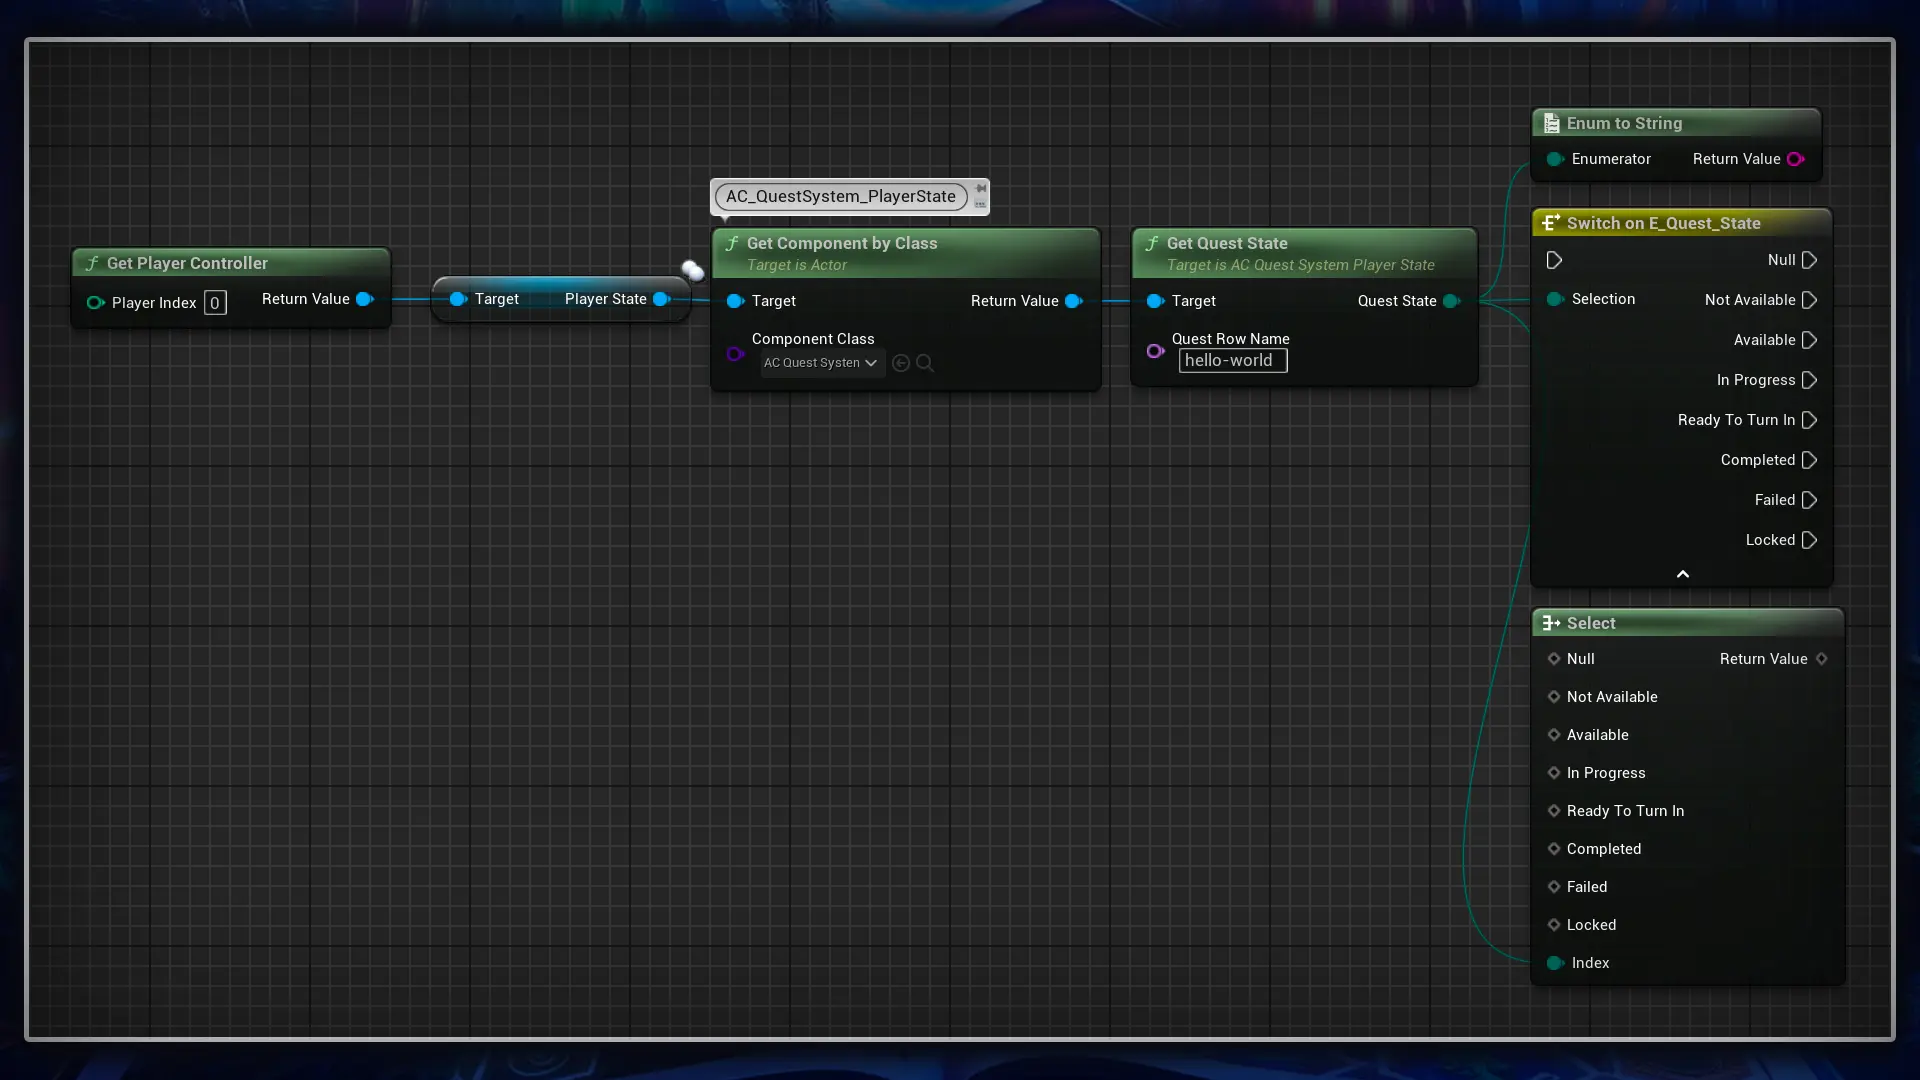
To get the current quest state from blueprint, follow these steps:
- Obtain a reference to the AC_QuestSystem_PlayerState component on the Player State for the player you wish to get the current quest state of.
- Call the getQuestState function on the component's reference.
- Set QuestRowName on this event to the Row Name as it matches in your quest data table for this quest.
The return value of this function will be the current QuestState. To view the possible values view the Quest State chapter.
Getting notified of changes to the Quest State
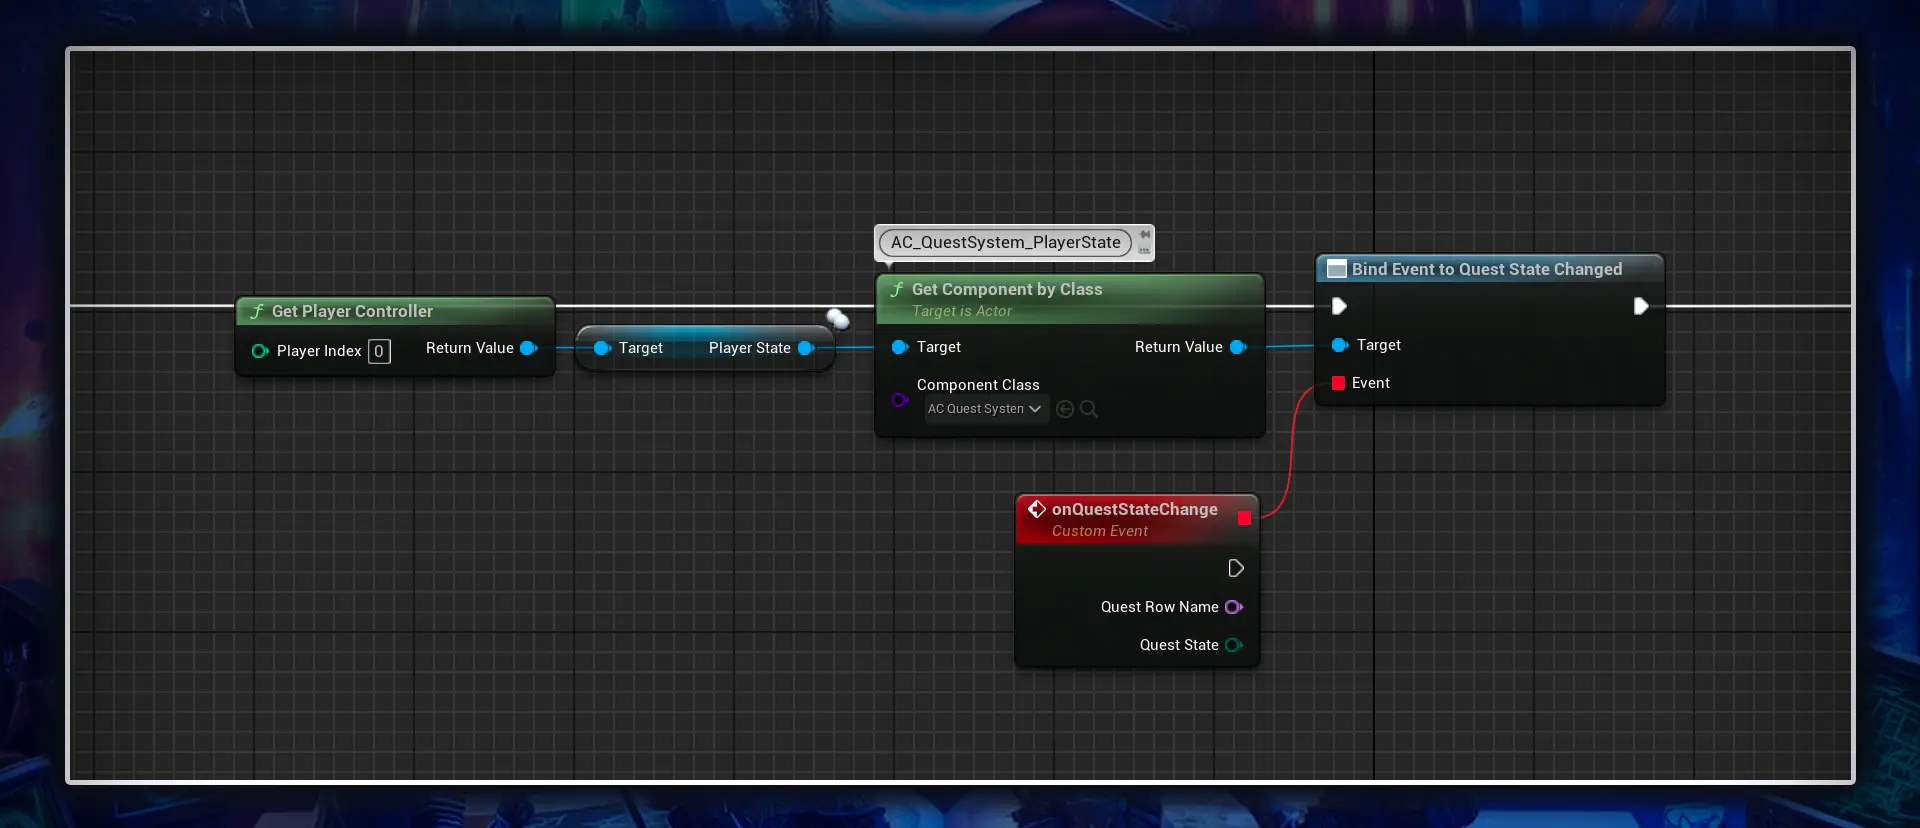
To get notified when the current quest state changes for the player from blueprint, follow these steps:
- Obtain a reference to the AC_QuestSystem_PlayerState component on the Player State.
- Bind into the QuestStateChanged event dispatcher. This event dispatcher will be called whenever a quest state changes for any quest, for this player. When the event is called it will include the QuestRowName and its current QuestState.
There are a number of different event dispatchers to notify you of different things, such as objectives completing, or objective counts changing. You can learn all about these in the Event Dispatchers section of the System Overview.
Getting the Quest Data
There are two methods to get the quest data stored in our data table from within blueprint:
If you have access to a player follow these steps to obtain this data ...
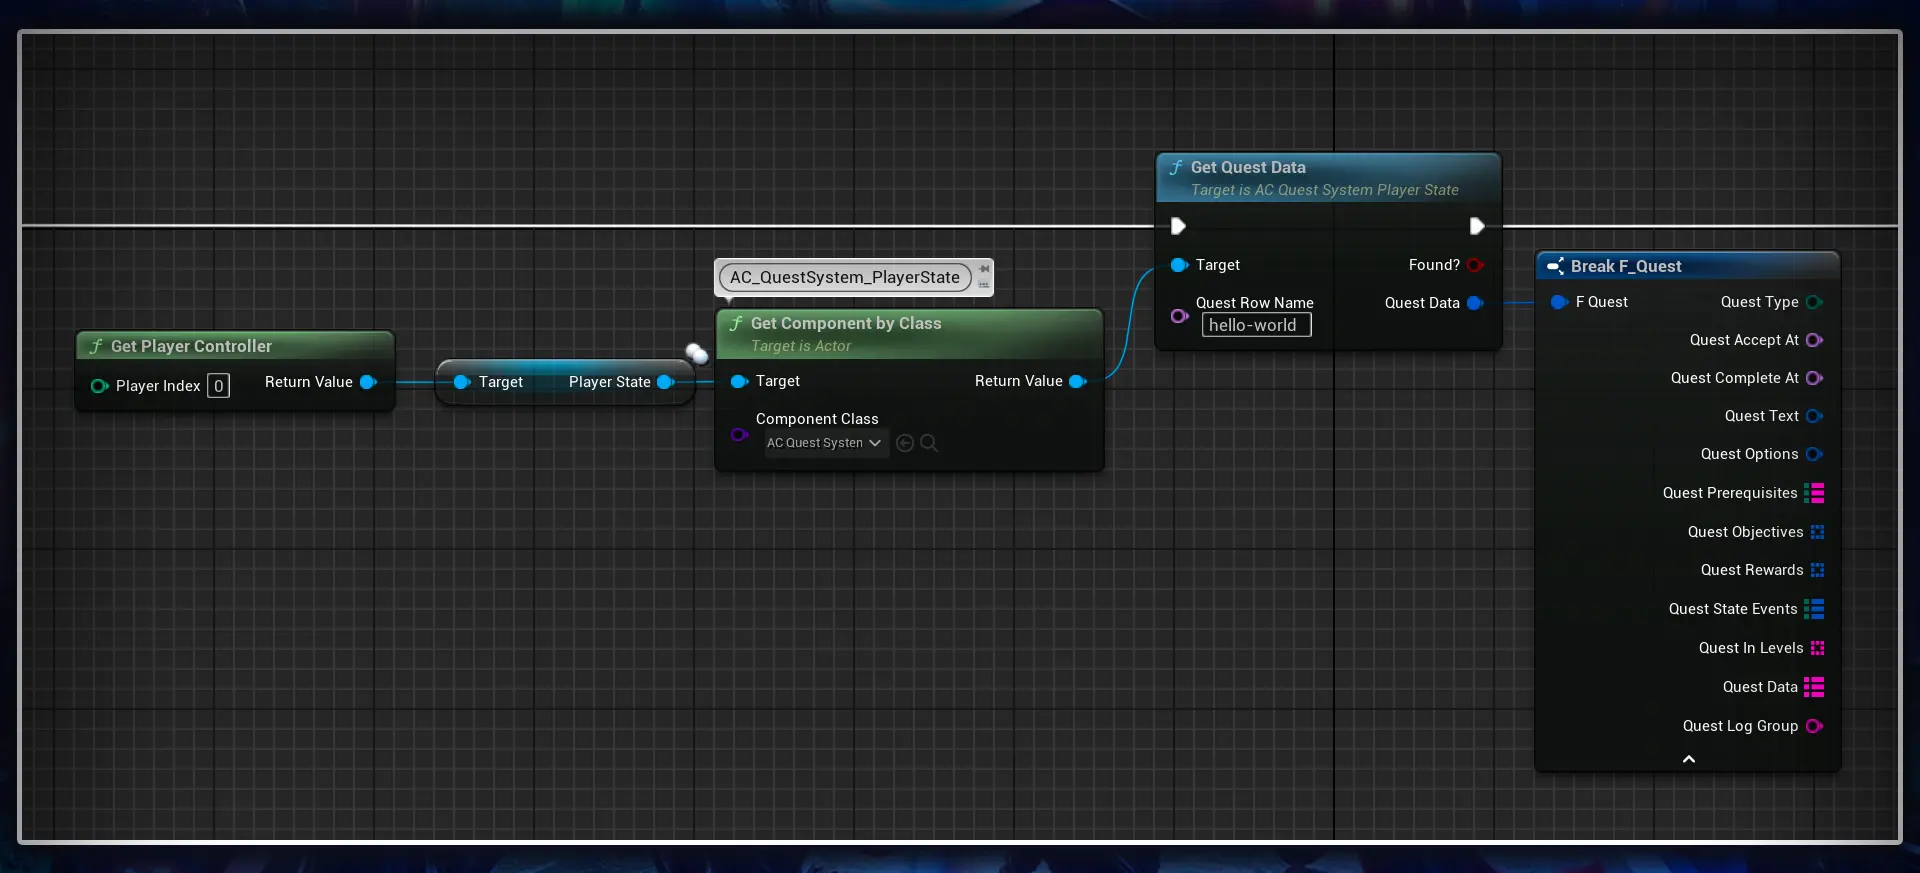
- Obtain a reference to the AC_QuestSystem_PlayerState component on the Player State.
- Call the getQuestData function on the component's reference.
- Set QuestRowName on this event to the Row Name as it matches in your quest data table for this quest.
The return value from this function will include everything available in the Data Table for this quest row as well as a boolean to check and see if the quest was actually found.
If you are working from another blueprint like an actor and do not have access to a player follow these steps to get the quest data ...
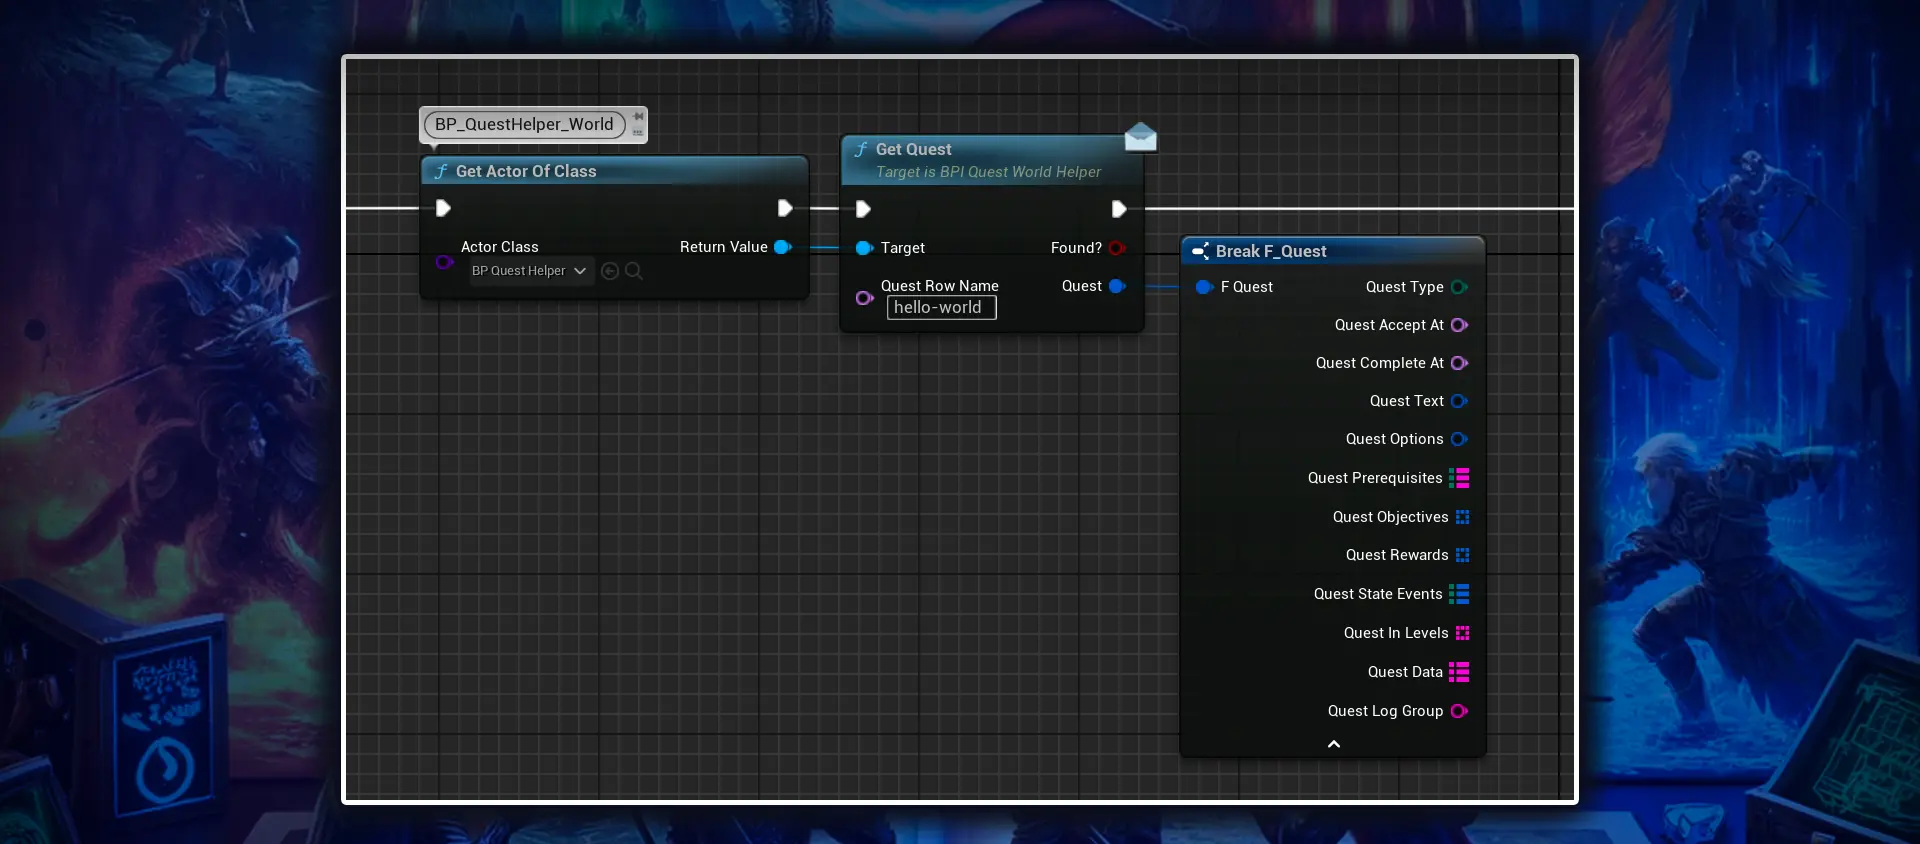
- Obtain a reference to the BP_QuestHelper_World which should exist in your level. It is added automatically (by the first player controller component to connect), but can also be added manually.
- Call the getLevelQuest function from this reference (the getQuest blueprint interface function can be used as well, they both return the same value).
- Set QuestRowName on this function to the Row Name as it matches in your quest data table for this quest.
The return value from this function will include everything available in the Data Table for this quest row as well as a boolean to check and see if the quest was actually found.
In multiplayer you should only use the world helper from remote actors and not something related to the player. This is because the world helper only exists on the server.
You can learn more about the World Quest Helper in the Quest Helper section of the documentation.
Showing a Quest Window
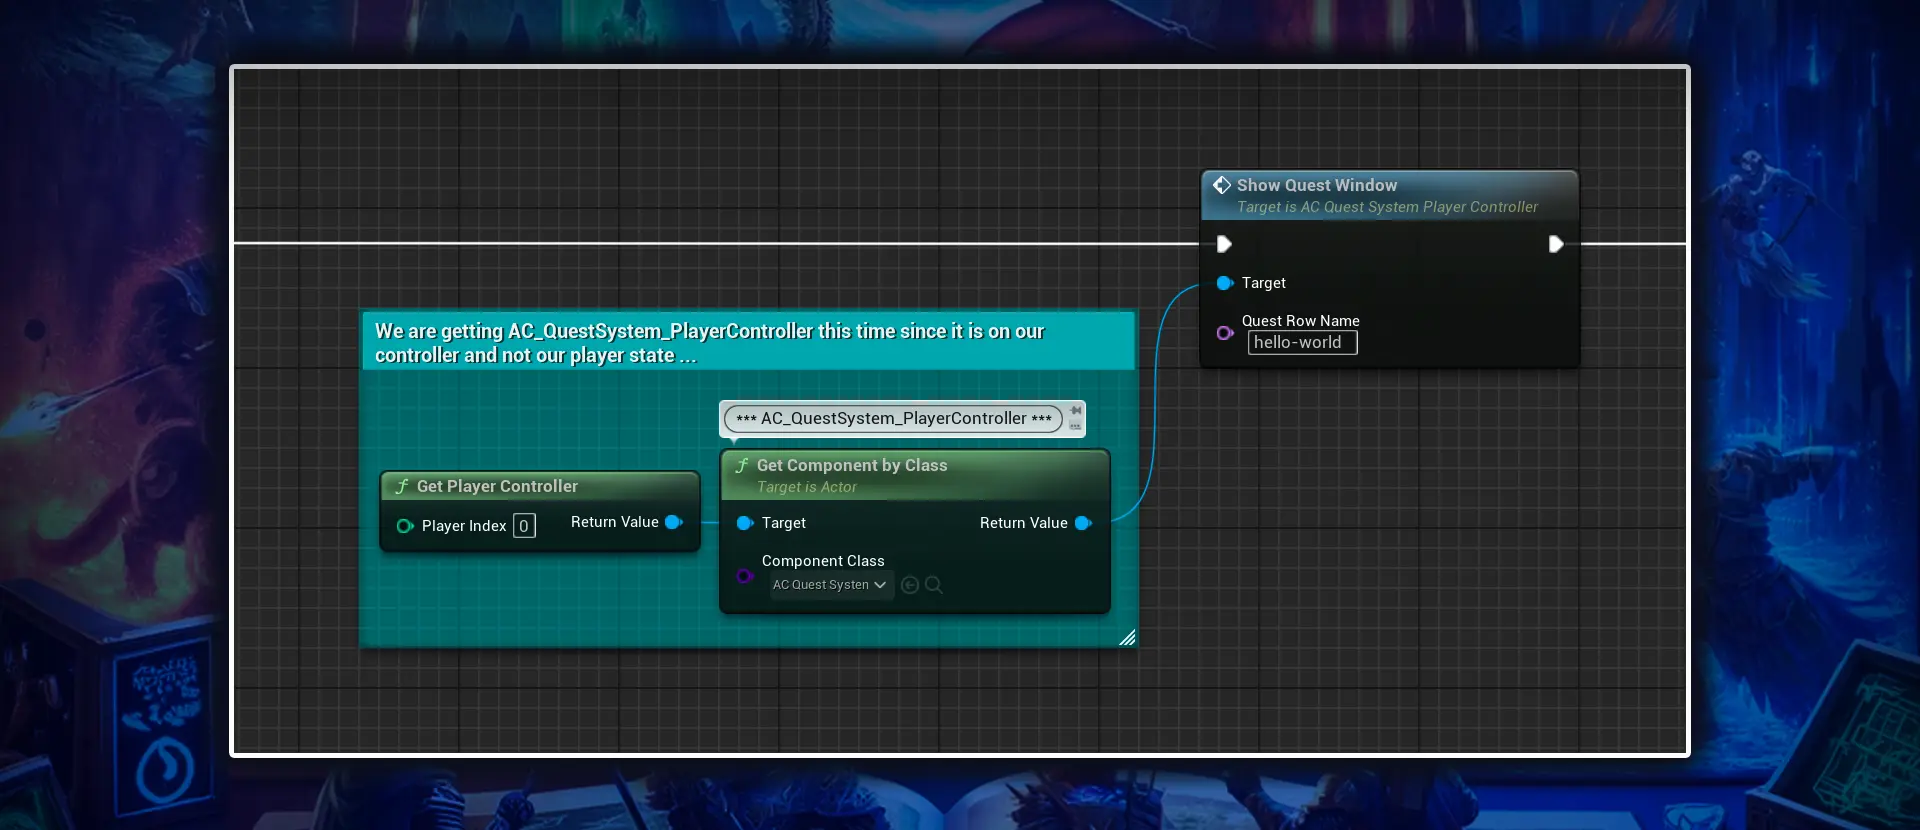
Up until this point all of our examples use our player state component. When it comes to UI we have to switch to our player controller component. To show a quest window for the player within blueprint, follow these steps:
- Obtain a reference to the AC_QuestSystem_PlayerController component on the Player Controller for the player you wish to show the quest window on.
- Call the showQuestWindow function on the component's reference. In multiplayer make sure you are only calling this from the client and not the server.
- Set QuestRowName on this event to the Row Name as it matches in your quest data table for this quest.
There are also functions in the controller component for showing the quest log (using showQuestLog), as well as showing small alerts (using showAlert) if you need.