How to create a Quest
UE5 Quest System Version: 2.0How to Make a Quest Video Guide
This video guide will walk you through making a quest step by step. If you prefer text over video keep reading below for a breakdown of everything.

Plan your Quest first!
Before you dive in it's a good idea to have a clear plan for your new quest. Think about who or what will start the quest, what the objectives (the goals of the quest) will be, and where and how it will be completed.
Don't stress about the text, prerequisites, events, rewards, or any other extra specific details or options just yet. Focus on building the core of your quest functionality while testing it first, then come back later to add in those extra goodies once you're happy with the foundation and flow of it.
The reason I recommend this is because you may not actually like your quest by the time you play through it. You avoid wasting a lot of time spent on the extras by focusing on the foundation of it first.
Creating your Quest
Locate the DT_Quests Data table in the Blueprints/Variables/DataTables folder and open it. This is where all the quest data is stored. By default you will see all the included examples that are used by the demo world.
- Add a new row to the Quest Data Table using the button on the menu bar.
- Set the row name to something easy to remember and type, just like my examples. The row name is how we will reference this quest if we need to for any reason from the blueprint.
- Now we are ready to provide the data needed for our quest. At this point the first thing I do is set the Quest Accept At, and Quest Complete At. In this field you should provide an actor tag that you also use on the actor(s) you want to handle these actions in your world.
- Add the actor tags you used in Quest Accept At, and Quest Complete At to the actors in your level.
This is the essential setup for creating a quest. When you hit play, you should notice an indicator above your tagged actor, prompting you to accept the quest.
There is still a lot to do like setting our text, and creating our objectives, but if you are looking for just a quick TLDR you should be good to go by this point.
Quest Data Table Variables
When it comes to creating a quest, there are numerous components to consider. This page acts as your initial reference point for navigating the rest of the documentation. As you work within each section, be sure to explore any related linked pages of the documentation to delve deeper into the specific topic.
These variables are available for each of your quests in the DT_Quests Data table found in the Blueprints/Variables/DataTables folder.
Quest Type - The QuestType is where we can add some flair or special features to different types of quests. Typically, games have main story quests and side quests. Main story quests drive the central narrative, while side quests offer additional content. Some games include repeatable quests, while others feature unique quests. The distinction between main story quests and side quests is primarily about their presentation style and usage of prerequisites (to drive the main story). Repeatable and unique quest types offer unique functionalities. To learn more about these different types, check out the QuestType chapter in this documentation.
Quest Accept At - As mentioned above, this is the actor tag we placed on the actor(s) in our level we want the player to be able to accept this quest at. You can accept quests without a tagged actor, and I will show you how to do this in the Working in Blueprint chapter (next chapter).
Quest Complete At - Like the accept at, this is the actor tag we place on the actor(s) in our level we want the player to be able to complete this quest at. Your complete at tag can be the same as your accept at tag if you would like the actor to handle both of these actions. Also like the accept at, the complete at can be handled without an actor. We will go over this in the Working in Blueprint chapter (next chapter).
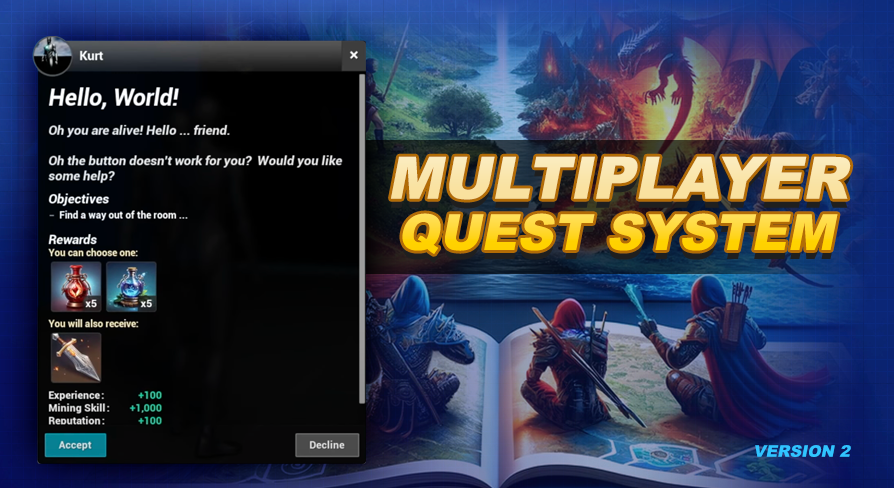
Quest Text - The QuestText section will let you define the Quest Title, Quest Description, as well as State Text to be shown based on the state of the quest. I recommend keeping your text simple for now, then come back later when you are happy with the gameplay flow of your quest to perfect it (remember our plan?).
Quest Options - This section allows us to manage various miscellaneous functionalities associated with the quest at different stages of its progression. Each option holds numerous possibilities, a breakdown of each option is provided on the Quest Options page. Now hold your horses, Timmy! It's important to review that section of the documents thoroughly before toggling any switches in here. Some features, like the rescanners, can be resource-intensive and should be used sparingly.
Quest Prerequisites - Quest prerequisites allow us to establish the conditions that players must meet before they can accept and complete a quest. Additionally, you can define prerequisites for individual objectives within the quest. There is a built-in method to seamlessly integrate your custom systems, such as inventory and experience systems, into the quest prerequisites framework. There is an entire chapter dedicated to Quest Prerequisites, make sure you check that out before you dive into this section.
Quest Objectives - Quest objectives outline the specific goals players need to accomplish to complete a quest successfully. Each quest can feature multiple objectives, each with its own set of optional settings aimed at giving you the leverage to create a unique and enjoyable experience. Quest objectives are a robust part of this framework, and to explore all the intricacies of quest objectives, make sure to review the Quest Objectives chapter of this documentation. There is a section in this chapter which will walk you through adding objectives to your new quest.
Quest Rewards - Quest rewards are how we acknowledge and celebrate the player's accomplishments upon completing a quest. While the Quest Rewards section of the documentation provides detailed insights and usage, here's a simplified overview of how it works: You get the flexibility to include any number of rewards per quest, ranging from guaranteed item rewards to allowing players to choose a single reward from a selection. Moreover, you can effortlessly grant numeric rewards for various in-game progressions, such as experience, reputation, and skill points. The Connected Systems chapter will guide you through integrating external systems, such as your inventory and experience systems, to handle rewards seamlessly.
Quest State Events - Quest state events provide a way to incorporate custom functionalities at different stages of our quest progression. These events can include actions like spawning actors, providing quest items to the player (when they accept the quest), or unlocking access to special areas (while the quest is in progress or completed). This system also comes with several predefined events to help you get started; and just like other aspects of creating a quest, there's a dedicated chapter solely focused on Quest Events for you to explore and leverage.
QuestsInLevel - If you want to restrict the loading of your quest to specific levels, you can use this variable to provide a list of those levels. If you leave it blank, the system will search for your quest in all levels loaded by the quest system. If you have cross level quests and you use this setting make sure to include all relevant levels in this list. Using this instead of letting the quest system check all quests in all levels is a way to add some performance by limiting what the loader has to process. This is mostly important to think about if you have lots of quests.
QuestData - In certain situations, you might find it necessary to store additional data specific to a particular quest. This data could be utilized elsewhere in your system or by custom objectives or prerequisites. The QuestData feature offers a string-to-string map, allowing you to associate key-value pairs with your quest. Whenever you retrieve your quest data (via the player state component), you'll have access to this information. I will show you how to retrieve data in the Working in Blueprint chapter.
QuestLogGroup - The Quest Log Group variable allows you to designate a string for grouping quests together within your quest log. If left blank, quests will be grouped under a dynamically created group titled 'Other Quests'. Utilizing this feature offers a more user-friendly interface for players, particularly when managing multiple quests simultaneously in the quest log.
Resetting your Quest
While constructing your quest, you'll probably want a simple way to reset its state. In the Demo/MapHelpers/Buttons folder, you'll discover the BP_PushButton_QuestState blueprint. Placing an instance of this button in your world allows you to quickly change the state of any quest you configure it for just by jumping on it. This is the same button that is used in a number of examples in the demo world. I suggest utilizing this button or setting up a keybinding to perform the same process.
There is also a delete player save button in this folder which will wipe out all quest data related to the player who steps on it.
These buttons are intended for development use only, but if you need to adapt the functionality to your game take a look inside the blueprints for these buttons to see how they work.
 DYNOOOooo! Can I just remove these demo world quests from the data table?
Yes Timmy, you can remove these, but if you do they will no longer work in the demo world. Now if you haven't made many quests with this system yet I recommend leaving them for now so you can use them as a reference as you build out your first few quests.
If you remove them and need to test something in the demo world in the future you will need to create a new project to access it. These demo quests are set up to only load in the demo world so they don't provide any extra overhead to your game at runtime.
The Quest Creation Workflow
For each quest you create, you'll add a new row to the quest data table containing your quest's specific information. You will also add the related actor tags to your actors in your levels.
When the game begins, the quest system automatically handles loading your level's quests and associating any relevant actors with each quest.
This connection is established by utilizing tags assigned to actors in your game world, which correspond to tags specified in the quest data table for your quest. These tags indicate where players can accept the quest (Quest Accept At), complete the quest (Quest Complete At), and for each quest objective using a target (with the Tag in TagData).
While actors are the default setup for this association, you're not limited to using them. For custom and UI-driven implementations, be sure to explore the next chapter, where we'll discuss how to work with the quest system using blueprints, such as how to accept quests, complete quests, and progress objectives all manually through blueprint.
For simpler quests, your main process for creating a quest will involve simply switching between this data table and tagging actors in your level. However, as quests become more complex, your involvement will extend to creating quest events and creating the integration support with other systems in your project, such as your inventory and experience systems (used for giving quest rewards and custom prerequisites). Integration with these other types of systems is something that is covered in detail in the Connected Systems chapter.
On the next page, we'll explore how to work with the quest system directly within blueprints.